Pavements - Ultrasonic Tomography (UST)
Target of Investigation
Regarding concrete pavement, ultrasonic tomography (UST) can be used for the following applications:
- Measuring the thickness of the surface course.
- Detecting reinforcement locations.
- Evaluating distresses, such as delamination, honeycombing, and voids, in the surface course.
UST can be used in the following ways for asphalt pavements and overlays when the asphalt mix is cold and stiff:
- Measuring the thickness of the surface layer.
- Detecting delamination and debonding.
Description
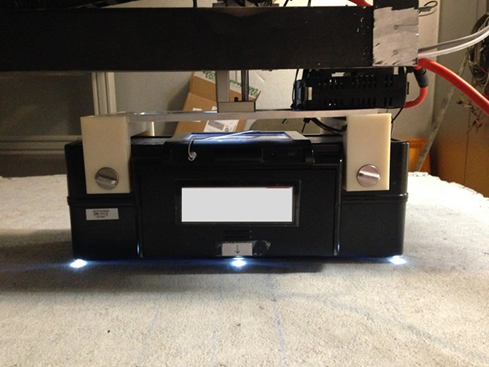
UST uses high-frequency (greater than 20,000 Hz) horizontal shear waves to characterize properties of or detect defects in the materials. Dry-point contact transducers generate ultrasonic waves that travel through the material and are received at different locations on the surface. Information about the material being tested can be acquired by propagating a signal through it and analyzing the signals acquired by the receivers. Figure 1 shows a state-of-the-art UST device for imaging concrete structures. It utilizes a 4- by 12-transducer array to perform a measurement in less than 3 s; this measurement results in a two-dimensional (2D) depth profile (B-scan).(1) The transducers provide the required consistency of impact and wavefront penetration for diagnostics up to 3 ft deep.(1) In evaluating heterogeneous materials, such as portland cement concrete or asphalt, the multiple sensor pairs in each scan allow for the necessary data redundancy. The signal is reflected by the interface of materials with different acoustic impedances, enabling the detection of concrete slab thicknesses, rebar locations, and anomalies in the surface course of a pavement.
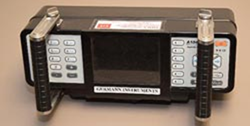 Source: FHWA.A. Top view.
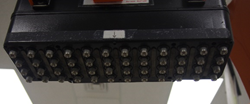 Source: FHWA.B. Bottom view.
Physical Principle
Ultrasonic shear waves propagate through the surveyed material and reflect off interfaces of objects of different acoustic impedances. As illustrated in figure 2, the transducer probe generates the waves while the receiving probe detects and records the reflected waves. Velocities of the waves in the material are calibrated by the transducers at fixed distances. The depth of the reflector (e.g., an internal flaw such as cracking, voids, delamination, or horizontal cracking) is measured through the two-way travel time of the pulse using the wave-propagation velocity in the investigated material.(2)
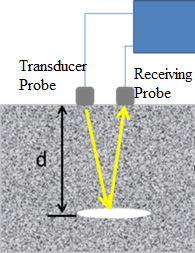 Source: FHWA.d = depth.
The 66 ray paths (each corresponding to an A-scan) involved during a measurement with UST at one test location are shown in figure 3. The UST uses the synthetic aperture focusing technique (SAFT) for analysis in scan mode to reconstruct the material being tested based on the shear‑wave reflections and to create a B-scan.(3,4) A B-scan is a 2D display of echo intensity versus depth along the aperture. The positions with high intensity are areas where there is a change in acoustic impedance, which could be an interface between two materials or defects in the material.
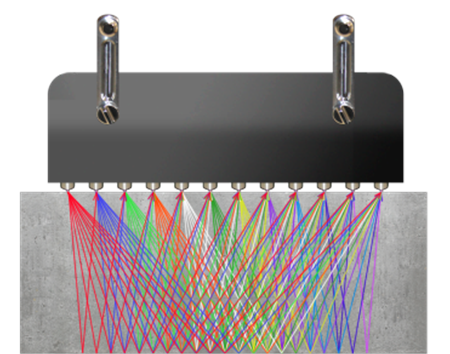 © 2018 Acoustic Control System—ACS Group, Germany.
Data Acquisition
To carry out a detailed inspection with a tomographer, the user lays out a series of parallel scan lines on the testing surface. If the whole interior of the material is to be examined, the distance between the scan lines should not exceed 250 mm (9.84 inches). Another series of lines perpendicular to the scan lines is laid out to create a grid with the scan lines. If the whole interior of the test material is to be inspected, the distance between these lines should not exceed 100 mm (3.93 inches). The antenna is oriented perpendicular to the direction of the scan lines, and data are recorded at each grid point along each scan line. After taking data along the first scan line, the operator moves to the beginning of the next scan line. The testing layout entered into the system is used during image reconstruction to establish the locations of the reflecting interfaces within the material. Figure 4 shows data collection with an ultrasonic tomographer.
 Source: FHWA.
Data Processing
After all the data are acquired at a test location, SAFT is used to reconstruct a 2D image of the interior of the concrete member at the test location that represents the locations of reflecting interfaces in the region below the transducers. At the completion of testing, data for the 2D images obtained and stored in the UST at each test location can be transferred to a laptop computer that contains three-dimensional (3D) visualization software. The software integrates the 2D images to create a 3D model of the test material. Figure 5 illustrates a reconstructed 3D model. The user can manipulate the 3D model by rotating it or looking at different orthogonal planes cutting through the model. A C-scan shows the reflecting interfaces on a plane parallel to the test surface and at different depths (z-axis); that is, it provides a plan view of the reflectors. A B-scan provides an end view of the reflectors. The B-scan views are the same images created at each test location by the tomographer. A D-scan provides a side view of the reflectors. The user can look at specific slices of the 3D model by defining the z-coordinate for a C-scan image, the y‑coordinate for a B-scan image, and the x-coordinate for a D-scan image.
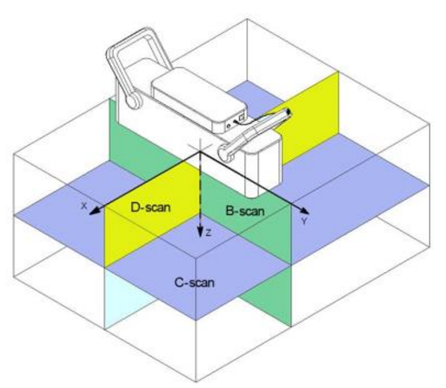 © 2018 Acoustic Control System—ACS Group, Germany.
Data Interpretation
The 3D model, along with different plane sections (B-, C-, and D-scans), can be used to interpret data. A color template is used to describe features depending on the strength of reflection of ultrasonic waves. In most cases, low reflectivity is described using cold colors (blues and greens), while high reflectivity is described using hot colors (reds and yellows). High reflectivity, in most cases, indicates the presence of objects and discontinuities, such as reinforcements, cracks, delaminations, and voids. Low reflectivity, in most cases, indicates a sound condition. Figure 6 shows a typical B-scan as viewed in the equipment display. Several types of features and defects encountered during the inspection are indicated.
 © 2013 TRB.1 mm = 0.039 inches.
The following are guidelines for interpreting data for common defects and features:
- Element thickness—Measuring the thickness of an element is based on the evaluation of the travel time of a pulse of ultrasonic waves reflected from the bottom surface of the layer. To get a clear reflection from the bottom surface, a strong contrast in acoustic impedances of the element material and material below the bottom surface is necessary. In the left side of figure 6, the bottom surface (backwall) is identified by a high-amplitude reflection in red. The horizontal shape of the reflection indicates the constant thickness of the element.
- Reinforcements, conduits, tendons, etc.—Cable-like objects are identified as localized high-intensity reflections, as shown in figure 6. Similar to thickness detection, there must be a contrast in acoustic impedances of the concrete and objects. The most effective way to detect the objects is by scanning perpendicular to the direction of their layout. A single scan will identify a linear object as a circular or oval high-amplitude region. The position and orientation of a linear object are defined from numerous parallel scans across the object. It is generally not possible to identify the material type. Examining the phase of the reflection can provide some insight on whether the reflector is of acoustic impedance higher or lower than the surrounding material. Rebars are most commonly recognized by a regular spacing between detected objects.
- Delamination—Similar to the detection of element thickness, delamination is identified as a high-amplitude linear reflection shallower than the actual thickness. Since delamination is often a curved and inclined surface, it may appear as a linear object with variable depths, as illustrated in figure 6. Since a delamination prevents propagation of ultrasonic waves below it, the bottom surface is not visible at delamination locations. Instead, ultrasonic waves are trapped between the delamination and top surface, which may result in multiple equally spaced reflections with depth in a B-scan.
- Air- and water-filled voids—Voids appear as high-amplitude reflections of a finite size. Because both air- and water-filled voids have lower acoustic impedances than concrete, it is nearly impossible to determine whether a void is filled with water.
Advantages
Advantages of UST include the following:
- Reliable, repeatable, and consistent results.
- Real-time data collection and processing.
- Detailed 2D and 3D images.
- Multiple applications (determination of layer thickness and rebar location and flaw detection).
- Low to medium level of expertise required for equipment setup and data collection with modern equipment.
Limitations
Limitations of UST include the following:
- Slow data collection.
- Difficult to detect additional reinforcement below two layers of reinforcement.
- Considerable engineering judgment required to properly evaluate a measurement.
- Possible misinterpretation when poor contact is made.
- Only works with cold and stiff asphalt pavements.
- Measurement has a limited ability to provide the degree of severity and cannot measure pavement condition below the top of the discontinuity.
References
- Hoegh K., Khazanovich L., and Yu, H.T. (2011). “Ultrasonic Tomography Technique for Evaluation of Concrete Pavements.” Transportation Research Record, 2232, pp. 85–94, Transportation Research Board, Washington, DC.
- American Concrete Institute Committee 228. (1998). Nondestructive Test Methods for Evaluation of Concrete in Structures, ACI, Farmington Hills, MI.
- Langenberg, K.J., Brandfaß, M., Hannemann, R., Kaczorowski, T., Kostka, J., Hofmann, C., Marklein, R., Mayer, K., Pitsch, A., (2001). “Inverse Scattering with Acoustic, Electromagnetic, and Elastic Waves as Applied in Nondestructive Evaluation.” Wavefield Inversion, pp. 59–118, Springer, Basingstoke, England.
- Marklein, R., Mayer, K., Hannemann, R., Krylow, T., Balasubramanian, K., Langenberg, K.J., Schmitz, V. (2002). “Linear and Nonlinear Inversion Algorithms Applied in Nondestructive Evaluation.” Inverse Problems, 18(6), pp. 1,733–1,759, IOP Science, Bristol, England.
- Gucunski, N., Imani, A., Romero, F., Nazarian, S., Yuan, D., Wiggenhauser, H., Shokouhi, P., Taffee, A., and Kutrubes, D. (2013). Nondestructive Testing to Identify Concrete Bridge Deck Deterioration, Report No. S2-R06A-RR-1, Transportation Research Board, Washington, DC.


