Tunnel - Infrared Thermography (IT)
Target of Investigation
Infrared thermography uses thermal cameras to record a surface’s electromagnetic wave radiations, which are related to temperature variations in an infrared wavelength.(1) For evaluating tunnels, infrared thermography is best used as a scanning tool to indicate where indepth testing should be performed with other systems.(2–4) Infrared thermography can be used for the following applications:
- Identifying delamination and shallow voids within concrete.
- Detecting debonding of architectural finishing elements.
- Locating moisture intrusion.
Description
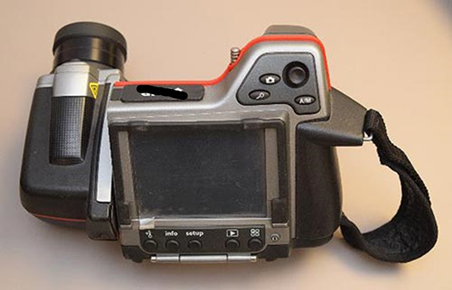
Infrared thermography detects potential defects and material variations within a structure. Infrared cameras measure the radiation emitted by a structure and convert it into an electronic signal, which is then processed to create maps of surface temperatures.(1) Defects, such as delamination, voids, debonding, and moisture intrusion, have different material properties (density, thermal conductivity, and specific-heat capacity) than sound concrete. The heating and cooling behavior of a surface can be used to indicate locations of potential defects. Research and testing have shown that infrared thermography systems are adequate for scanning purposes in tunnels.(2) While these systems cannot measure depth, they may detect moisture-containing voids up to 3 inches (76.2 mm) deep. Infrared thermography can be used for concrete, tile-lined concrete, and shotcrete tunnel linings. Active and passive heating are used in infrared thermography. Active heating uses a heat source, such as halogen lamps or electrical heating, to artificially heat the structure. Passive heating uses environmental conditions to heat the structure. Because active heating is impractical for large survey areas in tunnel applications, passive heating is used.(3) A typical handheld thermal camera suitable for tunnel surveys is shown in figure 1.
 Source: FHWA.
 Physical Principle
Infrared radiation is the part of the electromagnetic spectrum with wavelengths between 0.7 and 14 µm (0.028 and 0.55 mils). Infrared cameras measure the thermal radiation emitted by a body and capture temperature differences. These temperature variations are the result of heat flow and distribution within the body. These factors are affected by the thermal conductivity, specific-heat capacity, and density of the material.(1) Defects can cause heat flow and distribution to vary within the body and resulting surface temperatures to vary from those of a sound material.(2,4,5) For sound materials, heat is conducted away from the surface by the mass of the substrate during the heating process; thus, the temperature will increase slowly. For areas with air-filled defects (delamination, debonded tiles, or voids), the air pocket acts as a small insulator, trapping heat in the surface materials and causing the surface to heat faster. For debonded tiles that have moisture within the cavity, the water increases the specific-heat capacity, resulting in slower heating than the surrounding material.(4) When a structure is cooling, a cavity containing air cools faster than the surrounding sound concrete, and a cavity containing moisture cools slower than the surrounding sound concrete. Because underground water usually has a lower temperature than the ambient air and the structural members in a tunnel, water leakage and moisture intrusion usually register at lower temperatures in thermal images.
Data Acquisition
In tunnels, infrared thermography should be employed as a scanning tool to indicate where indepth testing using other methods should be performed. Scans should be collected every 1 ft (0.3 m) or at an interval determined by the inspector. Thermal images should be collected while the temperature is rising or falling because temperature changes provide a better chance of detecting possible defects. Surveys with handheld infrared cameras can be conducted at walking speed.(2)
Since thermal anomalies appear differently depending on environmental conditions, such as the season, planning when and how to conduct surveys is important. Early summer is the best time to conduct thermal surveys. Winter is the worst season; tunnel walls might be frozen, which results in blurry images and increases the likelihood of not detecting all anomalies. Survey direction also affects thermal images, so survey direction should be uniform during evaluations.(2)
The operator must ensure that the camera is properly focused before data collection begins. A typical process for collecting a thermal image is as follows:(2)
- Aim the camera at the tunnel lining. Note the temperature of the lining in the center of the display.
- Manually set a temperature range of approximately 5 ℉ (2.8 °C) (for example, 60–65 ℉ [15.5–18.3 °C] if the tunnel lining temperature at the center of the display is 62 ℉ [16.7 °C]).
- Adjust the range so that a color spectrum appears on the camera display.
- Record the image.
Data Processing
Thermal cameras contain data collection and management software. Images are stored with an image number and date and are later transferred to a computer. Thermal camera manufacturers provide software to further refine and inspect the images. The software has many functions, such as filtering the temperature data by a defined temperature range, changing the color palette, and so on. It can also output the thermal pictures in digital form so that analysis of the raw data can be performed with other software.
Data Interpretation
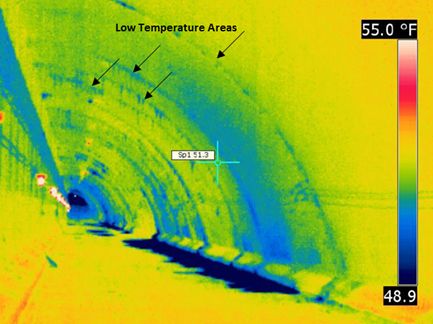
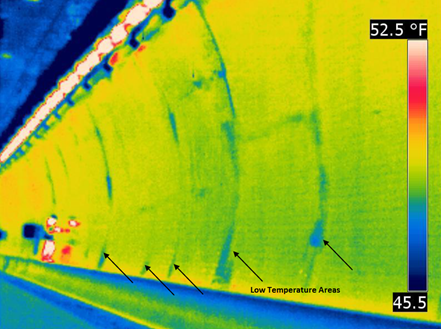
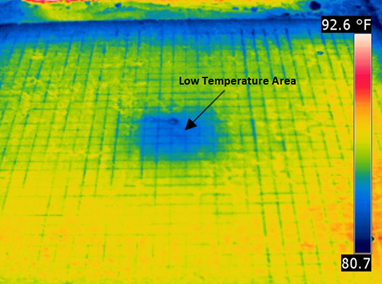
Infrared thermography surveys generally yield thermal images produced by a camera (figure 2 through figure 4). Such cameras can also be used to create thermal maps of the surface (figure 5). Images of the test site are used to detect moisture intrusion based on relative temperature differences within an image. Sections with excess moisture can be identified as cold spots in thermal images because of the low temperature of underground water. Interpretation of moisture measurements can be difficult because of factors like material emissivity changes, heat transfer through wet sections, cooling through air flow, and spurious radiation sources.(5) Interpretation of thermal images requires understanding of both thermographic principles and structural engineering practices.(3)
 © 2014 TRB.
T°F = 1.8 × (T°C + 32).
 © 2014 TRB.T°F = 1.8 × (T°C + 32).
 © 2014 TRB.T°F = 1.8 × (T°C + 32).
 © 2014 TRB.1 ft = 0.3 m; T°F = 1.8 × (T°C + 32).
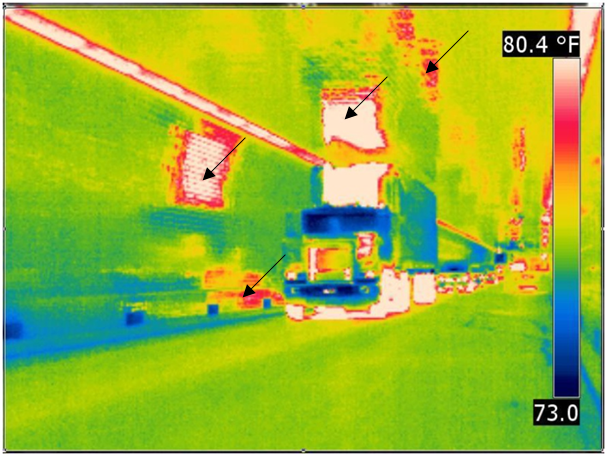
In figure 2, arrows indicate cracks and stalactites that contain moisture. In figure 3, debonded tiles (confirmed by a sounding evaluation) are indicated by the arrows on the tunnel wall. Figure 4 shows an air-filled void in a test specimen.(2) Environmental conditions should be considered when interpreting thermal images. These conditions include surface texture, which influences the surface temperature, and thermal reflections from vehicles within the tunnel (figure 6).(2)
T°F = 1.8 × (T°C + 32).
Figure 6. Infrared image. Tunnel with thermal reflections of vehicles visible on the tunnel lining.(2)
Advantages
Advantages of infrared thermography include the following:
- Fast method where first results can be seen during data collection.
- Easy to use.
- Effective on concrete, tile-lined concrete, and shotcrete tunnel linings.
Limitations
Limitations of infrared thermography include the following:
- Depth of anomaly is not measured.
- Normal operating temperatures (specified by the manufacturer of the camera) are necessary.(2)
- Environmental conditions—including time of day, time of year, surface texture, and presence of vehicles—affect results.
- Interpretation of results requires a detailed understanding of thermographic principles and structural engineering practices.
References
- Gucunski, N., Imani, A., Romero, F., Nazarian, S., Yuan, D., Wiggenhauser, H., Shokouhi, P., Taffee, A., and Kutrubes, D. (2013). Nondestructive Testing to Identify Concrete Bridge Deck Deterioration, Report No. S2-R06A-RR-1, Transportation Research Board, Washington, DC.
- Wimsatt, A., White, J., Leung, C., Scullion, T., Hurlebaus, S., Zollinger, D., Grasley, Z., et al. (2014). Mapping Voids, Debonding, Delaminations, Moisture, and Other Defects Behind or Within Tunnel Linings, Report No. S2-R06G-RR-1, Transportation Research Board, Washington, DC.
- Delatte, N., Chen, S., Maini, N., Parker, N., Agrawal, A., Mylonakis, G., Subramaniam, K., et al. (2003). “Application of Nondestructive Evaluation to Subway Tunnel Systems.” Transportation Research Record, 1845, pp. 127–135, Transportation Research Board, Washington, DC.
- Li, Z., Yao, W., Lee, S., Lee, C., and Yang, Z. (2000). “Application of Infrared Thermography Technique in Building Finish Evaluation.” Journal of Nondestructive Evaluation, 19(1), pp. 11–19, Springer, New York, NY.
- Wiggenhauser, H. (2002). “Active IR-applications in civil engineering.” Infrared Physics & Technology, 43(3–5), pp. 233–238, Elsevier, Amsterdam, Netherlands.


