Tunnel - Active Infrared Thermography (IRT)
Target of Investigation
Active infrared thermography (IRT) can be used for the detection of subsurface defects in a variety of materials. Main applications of active IRT include detecting the following:
- Shallow delamination in concrete members.(1)
- Corrosion of steel members under paints.
- Debonding of tiles in tunnels.(2,3)
- Delamination in fiber-reinforced polymers.(4)
- Shallow utilities, honeycombing, and voids in concrete members.
Description
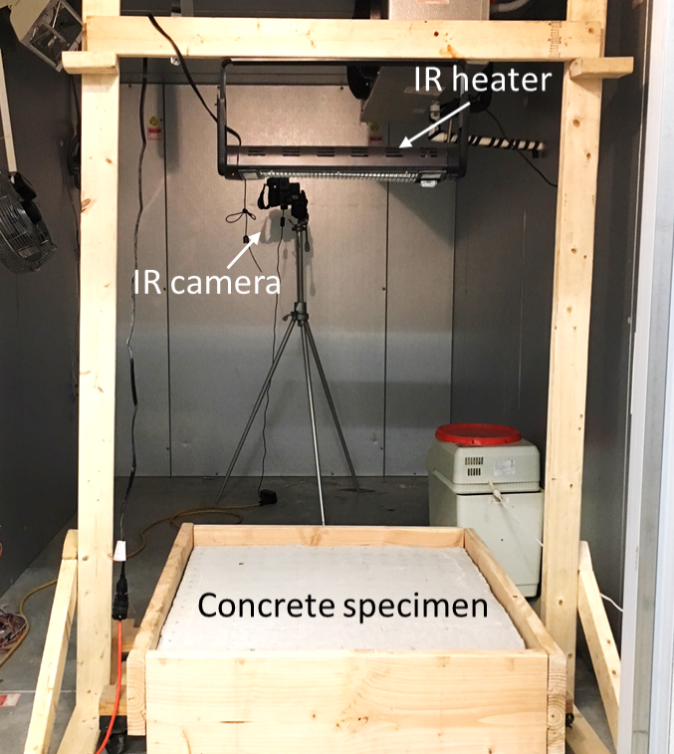
Unlike passive IRT, which uses solar radiation or heat from the surrounding area, active IRT uses an external heat source to induce thermal changes in the material being tested. The heat source can be a propane heater, high-power lamp, infrared (IR) heating element, or flash lamp.(1,5) An IR camera measures IR radiation and converts such measurements into electrical signals. The detection of defects is based on measuring temperature variations on the surface of an element; these variations are caused by different thermal conductivity, specific heat capacity, and thermal conduction because of discontinuities in the element. Thermal images may be captured before the heating period, during the heating period, and during the cooling period. Figure 1 shows the test setup for detecting concrete delaminations in a specimen with active IRT. Areas with shallow delaminations heat up more quickly and develop surface temperatures up to several degrees higher than the surrounding areas of sound steel.(6)

Figure 1. Photo. Concrete delamination detection using active IRT.
Active IRT can be categorized by its applied heating function. Impulse thermography applies a short energy pulse to the measured object with high-energy flash systems. Transient thermography is similar to impulse thermography, but the energy is applied over a period of time. Transient thermography allows the use of low-cost excitation sources, such as halogen lamps or hot-air blowers. Lock-in thermography applies periodic harmonicmodulated energy to the element. The depth range can be set through the modulation frequency of the excitation source to obtain the best possible result. Compared to the transient method, measuring times needed for lock-in thermography are considerably longer.
Physical Principle
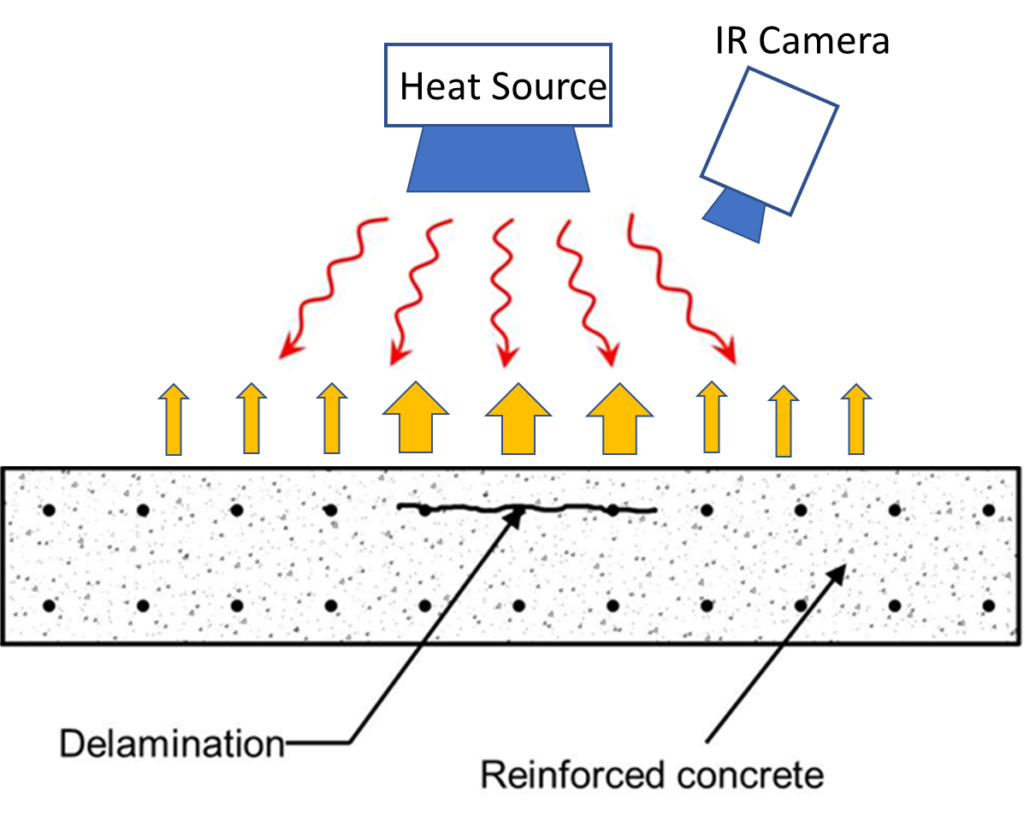
IRT is based on measuring thermal radiation emitted by structural elements (figure 2). Thermal radiation, which is in the wavelength range of 0.7–14 μm (0.028–0.55 mils) of the electromagnetic spectrum, is controlled by three main properties that influence the heat flow and distribution within a material: thermal conductivity, specific heat capacity, and mass density. Exposing the surface of a material to a radiant heat source, such as an IR heater, will cause an increase in surface temperature and diffusion of heat into the material to achieve thermal equilibrium. Subsurface defects, such as delamination or steel corrosion, interrupt the flow of heat. As a result, the surface temperature will be higher in the area of the defect relative to the surface temperature adjacent to the flaw. Therefore, it will cause higher radiation.

Figure 2. Illustration. Physical principle of active IRT.
Data Acquisition
Active IRT uses radiant and fan heaters or flash and halogen lamps, thus eliminating dependence on heat from the sun or other natural heating sources. While active IRT may produce better controlled and higher quality results than passive IRT, it is used only in evaluations of smaller elements. IR cameras used for active IRT typically have the ability to capture thermal images at fixed time intervals during the course of testing. Many images are captured during heating and/or cooling of the material and stored for analysis. ASTM D4788-03, Standard Test Method for Detecting Delaminations in Bridge Decks Using Infrared Thermography, can be used for surface preparation and other steps of data acquisition.(7)
Data Processing
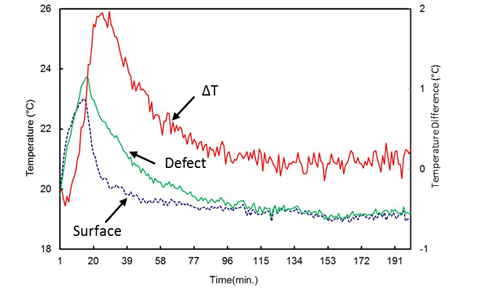
An IR thermal camera records a series of IR images or a video. Thermal images in combination with digital camera images facilitate locating potential defects and anomalies on the surface of an element. Data processing involves analyzing thermal images to identify anomalies in the material being tested. Data may be processed in several ways. Temperature anomalies may be observed in the thermal images produced following the heating of the surface. The time series data for individual pixels in the thermal image may be analyzed as shown in figure 3.(8) The amplitude and delay of the peak of this signal are a function of the depth, thickness, and spatial extent of the defect and may be further analyzed to better characterize the defect.

ΔT = temperature change.
T°F = (T°C × 1.8) + 32.
Figure 3. Graph. Surface temperature variations and thermal contrasts as a function of time.
More advanced methods of processing data from active IRT tests include analyzing the slope of the heating and cooling cycle and time characteristics (i.e., phase) and frequency characteristics of the temperature decay.(9) In most cases, results of the IRT inspection are displayed as an image of part of the surface to identify flaws against the background of sound material.
Data Interpretation
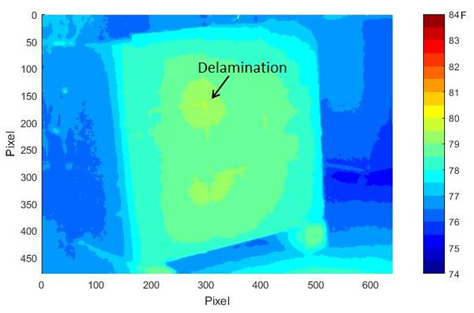
Similar to passive IRT, surface temperature from active IRT tests can be presented in colorcoded contour maps (figure 4). Areas with damages or defects manifest as different colors than sound areas. IR images from active IRT tests can be compared to or superimposed on regular photos to enhance the interpretation of conditions by correlating the visible damage, such as spalling on the surface, to thermal anomalies.

T°F = (T°C × 1.8) + 32.
Figure 4. Contour Surface temperature of tiled concrete from an active IRT test.
Advantages
Advantages of IRT testing include the following:
- Temperatures can be compared directly via an image.
- Results are less dependent on environmental conditions at the time of the test.
- Data provided can be processed to infer characteristics of a defect (e.g., size, depth).
- Equipment setup is fast and easy.
- Data analysis is generally straightforward, with the inspector looking for hot spots.
Limitations
Limitations of IRT testing include the following:
- Quality cameras are often expensive.
- Accurate temperature measurements are hindered by differing emissivity and reflections from other surfaces.
- Surface conditions (e.g., water, oil stains, or debris) can cause problems with data.
- Flaws deeper than 4–5 inches (10.16–12.7 cm) are difficult to detect in concrete elements.
- Heating large areas may be impractical, so it is used only in surveys of small areas and objects.
- Access to the inspection surface is required to position the heating source.
- Increased time is required for testing relative to conventional thermography.
References
- Maser, K. (2004). Active Heating Infrared Thermography for Detection of Subsurface Bridge Deck Deterioration, Transportation Research Board, Washington, DC.
- Tanaka, H., Tottori, S., and Nihei, T. (2006). “Detection of concrete spalling using active infrared thermography.” Quarterly Report of RTRI, 47(3), pp. 138–144, Railway Technical Research Institute, Tokyo, Japan.
- Wiggenhauser, H. (2002). “Active IR-applications in civil engineering.” Infrared Physics & Technology, 43(3–5), pp. 233–238, Elsevier, Amsterdam, Netherlands.
- Starnes, M., Carino, N., and Kausel, E. (2003). “Preliminary Thermography Studies for Quality Control of Concrete Structures Strengthened with Fiber-Reinforced Polymer Composites.” Journal of Materials in Civil Engineering, 15(3), pp. 266–273, American Society of Civil Engineers, Reston, VA.
- Maierhofer, C., Arndt, R., Röllig, M., Rieck, C., Walther, A., Scheel, H., and Hillemeier, B. (2006). “Application of impulse-thermography for non-destructive assessment of concrete structures.” Cement and Concrete Composites, 28(4), pp. 393–401, Elsevier, Amsterdam, Netherlands.
- Washer, G., Dawson, J., Ruiz-Fabian, P., Sultan, A., Trial, M., and Fuchs, P. (2016). Field Testing of Hand-Held Infrared Thermography, Phase Ⅱ, Report No. cmr 16-007, Missouri Department of Transportation, Jefferson City, MO.
- ASTM D4788-03. (2013). “Standard Test Method for Detecting Delaminations in Bridge Decks Using Infrared Thermography.” Book of Standards 04.03, ASTM International, West Conshohocken, PA.
- Fenwick, R. (2010). Environmental Effects on Subsurface Defect Detection Without Solar Load, Master’s Thesis, University of Missouri, Columbia, MO.
- Maldague, X.P. (2001). Theory and Practice of Infrared Technology for Nondestructive Testing, Microwave and Optical Engineering Series, Wiley & Sons, New York, NY.


