Pavements - 2D and 3D Imaging Technology (IT)
Target of Investigation
Two-dimensional (2D) and three-dimensional (3D) imaging technologies are used for evaluation and management of surface distress of highway pavements, most commonly in the form of crack mapping. 2D imaging systems have been used to map cracks in highway pavements for two decades but have several limitations.(1) 3D imaging systems overcome these limitations and incorporate depth measurements into pavement surveys.
Human observation, which is the most widely used method for evaluating pavement surface distress, is labor intensive, high variability, and hazardous to inspectors performing evaluations.(2) Early observational and imaging surveys were often of poor quality because they lacked consistency, repeatability, and accuracy.(3) Automated 2D and 3D imaging systems have the potential to efficiently provide precise pavement distress evaluations. (3) 2D and 3D imaging can also be used to identify AC longitudinal joints that are displaying deterioration. These technologies have been successfully used to measure faulting as well
Description
2D Imaging Systems
When mounted on a vehicle, 2D imaging systems (figure 1) map cracks in pavements by capturing images of the pavement along the road being surveyed. Early systems took a series of analog still pictures or continuous-image film of the survey area, and those images were then digitized for further analysis. Those analog systems have been supplanted with more efficient digital cameras.(2)
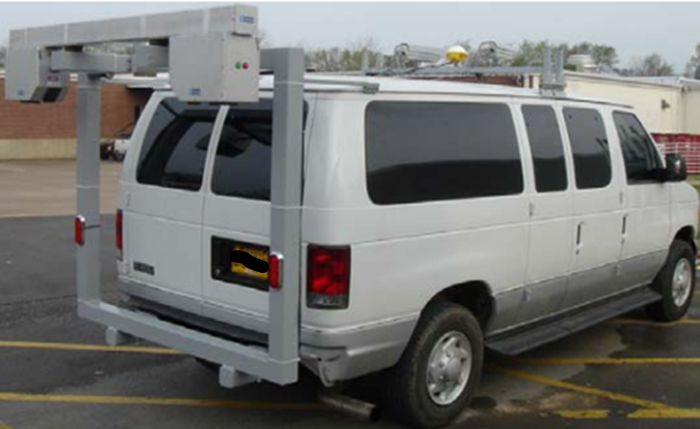
Identification and estimation of the dimensions and distribution of cracks (collectively called crack mapping) work based on the assumption that cracks will manifest as areas that are darker than the surrounding intact pavement. Attempts to fully automate the mapping process of 2D imaging have been hampered by limitations of the quality and resolution of images, limited visibility of cracks on certain pavements, sensitivity to lighting conditions, the presence of shadows, the presence of stains, poor intensity contrast between cracks and pavement, and the inability to evaluate depth parameters.(1) To minimize problems with lighting conditions, linescanning techniques, in which a laser is used to artificially illuminate the surface so that the reflections of the laser beam on the surface are collected in lateral scans, have become more common than the earlier methods for scanning unlit areas.(2) Unfortunately, other problems inherent to 2D imaging systems have not been fully resolved.
3D Imaging Systems
3D imaging systems were developed to reduce the limitations of 2D imaging systems. Research has been done regarding implementing stereovision to develop 3D images. This technique uses two cameras to capture two images of the same location. Computer software produces a 3D image using the sets of pictures by matching the images using common points between them.(3,5) Since this technology still uses 2D images, it allows for evaluating depth parameters while retaining the other features of 2D imaging systems, especially providing uniform light intensity for both images under direct sunlight.(3)
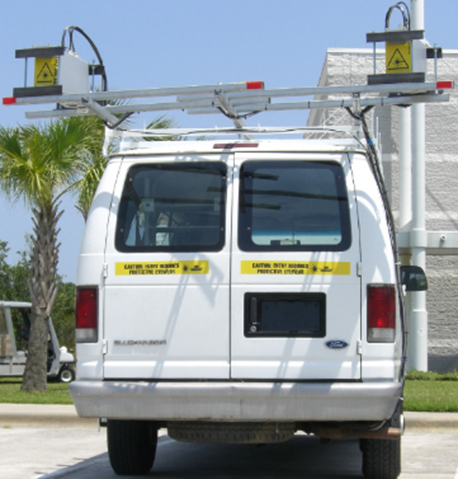
Most 3D imaging systems use laser imaging. Two high-performance laser-profiling units are mounted on a vehicle (figure 2). Each profiling unit consists of a 3D laser profiler (laser line projector), custom filter, and area-scan camera employed as a detector. The laser profile projects an image of a laser light strip onto the pavement; the detector captures the image. Based on the calibrated geometry of the system and the deformation of the laser line projected onto the pavement, the elevation of the surface can be estimated by reconstructing a set of 3D points.(6) A complete dataset creates a 3D model of the surface, from which the geometry and dimensions of the surface cracks, including depth parameters, can be estimated using automated or semiautomated software. Some systems are capable of simultaneously collecting 2D and 3D data with a depth resolution of 0.3 mm (0.01 inches) and lateral resolution of 1.0 mm (0.04 inches) while traveling at 60 mph (96 km/h).(3) The clear advantages of 3D laser imaging systems are that they are not sensitive to lighting effects during data collection or affected by either stains on the pavement or poor intensity contrast between the crack and surrounding pavement.(1)
 © 2012 Springer.
Physical Principle
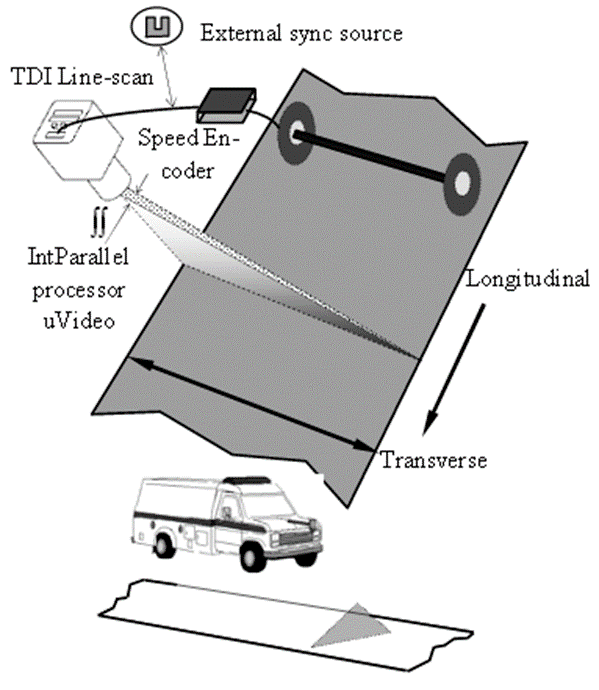
2D imaging systems use line scanning, which is a tool that allows the operator to consider the resolution both across the pavement (transverse resolution) and along the movement path (longitudinal resolution). The transverse resolution is controlled by the number of pixels in the camera. The longitudinal resolution is a function of the speed of the vehicle and scan rate of the camera. Common line-scan sensors today have more than 10,000 pixels and can scan at rates above 10 kHz. An inspection with a line-scan camera can provide 100-percent coverage of the surface at one predetermined resolution for longitudinal and transverse directions (figure 3). The scan rate of a line-scan camera can be dynamically adjusted to satisfy the requirement of uniform resolution in both directions by transmitting the speed of the vehicle, measured with an encoder, to the camera in real time. With the speed known and resolution fixed, the collected digital information from a line-scan camera along transverse lines are formatted and fed into a processor for image processing.(2)
 © 2011 Wang, K.C.P. TDI = time-delayed integration.
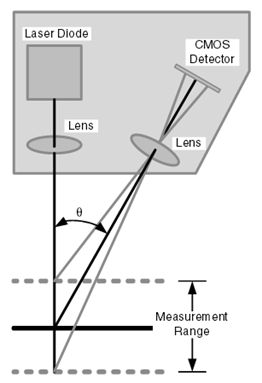
 3D laser imaging is based on the triangulation principle. A specific—and often fixed—pattern of illumination, such as a laser line, is projected onto the pavement (figure 4). A digital area-scan camera is placed at a known distance and oblique angle from the light projector. The system has time-delayed integration and uses either a charged coupled device or a complementary metal oxide semiconductor (CMOS) sensor. The camera takes images of the structured light, and the deformations of the laser line on the pavement are analyzed to evaluate the depth (z-axis) for each point at a known horizontal position (x-axis) on the pavement. The system is usually coupled with an encoder to obtain the longitudinal (y-axis) position of each point.
 © 2012 ASCE. All rights reserved. θ = angle between laser diode and CMOS detector centerlines.
 Data Acquisition
Since there are only a few 2D and 3D imaging systems and they are at various stages of development, data collection procedures are not standardized. At the basic level, instructions and guidelines provided by manufacturers or developers should be followed to establish data collection procedures. The systems should be calibrated prior to data collection. Most systems cover a full lane width. Data are automatically compiled and saved. Depending on the software and automation capabilities, collected data can be processed on site or stored for future processing.
Data Processing
Most automated processing software packages follow a similar conceptual approach, but the algorithms and processes employed vary from developer to developer. 2D imaging pavement surveys use 8-bit (256 levels of luminance per pixel) images to subjectively determine the dimensions and geometry of cracks (figure 5). That process is affected by the level of uniformity of the width and geometry of a crack. In the processing unit, the 8-bit grayscale images are filtered with customized algorithms to eliminate a large portion of noncracked areas. The remaining visual information is then converted into a black–white binary format. Noise in the binary images is removed, and the disconnected cracks are linked together. A vectoring analysis can be conducted on the remaining information in the image to obtain geometry data for each crack, including length, width, orientation, and location. These data are then saved.(4) Only a few automated processing systems are available commercially. Some 2D imaging systems provide only images, so those performing the evaluation must obtain processing software.
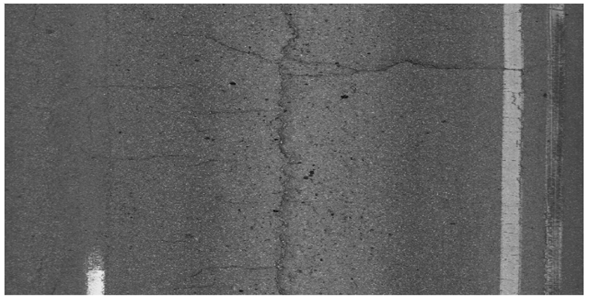 © 2011 Wang, K.C.P.
 3D imaging systems usually include software packages for automated processing of crack mapping (figure 6). Some also allow the user to perform semiautomated analyses.(3) The user should refer to user manuals.
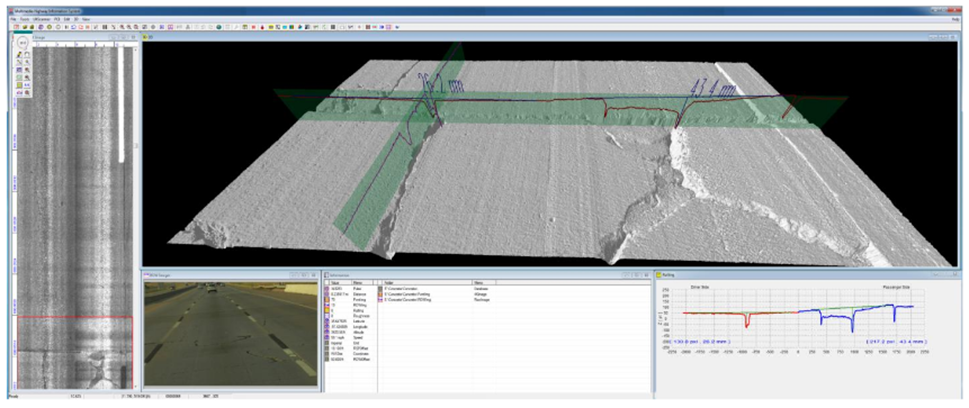
© 2014 Kelvin C.P. Wang.
Data Interpretation
2D and 3D imaging systems generate data on surface cracking of pavements. 2D imaging systems provide the crack width, intensity, and distribution (figure 7). 3D imaging systems can potentially provide crack depth parameters (figure 8) in addition to the information provided by 2D imaging systems. The data gathered by both types of systems can be used for pavement distress evaluation and pavement management.
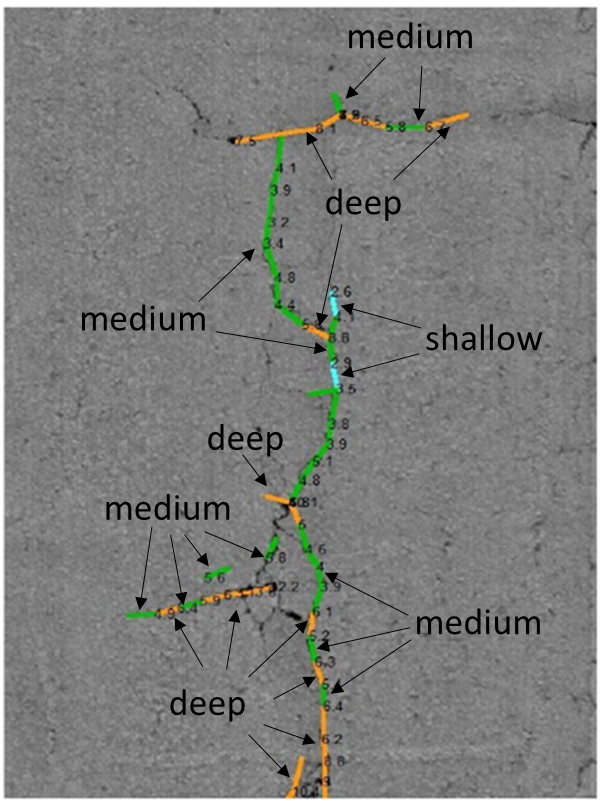 © 2012 Springer.
 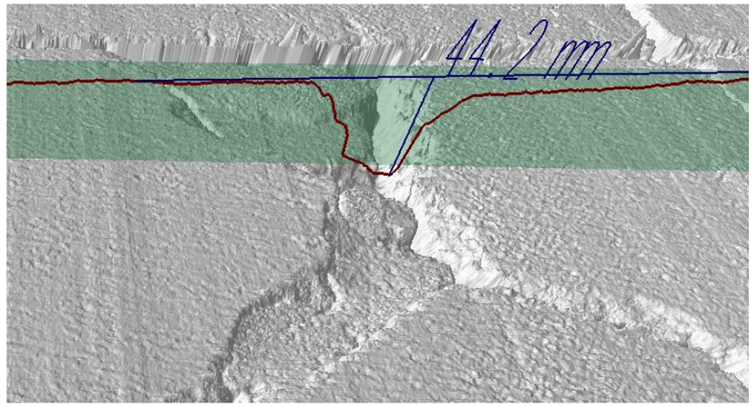 © 2014 Kelvin C.P. Wang. 1 mm = 0.04 inches.
 Advantages
Advantages of 2D and 3D imaging systems compared to visual observation surveys include the following:
- More efficient and safer.
- More comprehensive and quantitative information about distress.
Limitations
Limitations of 2D and 3D imaging systems include the following:
- Many systems and methods are at various stages of development.
- 2D imaging systems are affected by lighting conditions and shadows, nonuniform crack width and geometry, stains on pavement, and poor intensity contrast between cracked and sound pavements.
- 2D imaging systems do not provide depth measurements.
References
- Tsai, Y.J. and Li, F. (2012). “Critical Assessment of Detecting Asphalt Pavement Cracks under Different Lighting and Low Intensity Contrast Conditions Using Emerging 3-D Laser Technology.” Journal of Transportation Engineering, 138(5), American Society of Civil Engineers, Reston, VA.
- Wang, K.C.P. (2011). “Elements of automated survey of pavements and a 3-D methodology.” Journal of Modern Transportation, 19(1), pp. 51–57, Springer, Chengdu, China.
- Wang, K.C.P. and Li, J.Q. (2014). 3-D Laser Imaging for ODOT Interstate Network at True 1-mm Resolution, Report No. FHWA-OK-14-14, Oklahoma Department of Transportation, Oklahoma City, OK.
- Wang, K.C.P. and Smadi, O. (2011). “Automated Imaging Technologies for Pavement Distress Surveys.” Transportation Research Circular E-C156, Transportation Research Board, Washington, DC.
- Bao, G. and Salari, E. (2011). “Automated Pavement Distress Inspection based on 2-D and 3D Information.” Presented at 2011 IEEE International Conference on Electro/Information Technology, Mankato, MN. Available online: http://ieeexplore.ieee.org/stamp/stamp.jsp?tp=&arnumber=5978575&tag=1, last accessed April 1, 2016.
- Tsai, Y.J., Jiang, C., and Wang, Z. (2012). “Pavement Crack Detection Using HighResolution 3-D Line Laser Imaging Technology.” Proceedings of the Seventh RILEM International Conference on Cracking in Pavements, 4, pp. 169–178, Springer Nature, New York, NY.


