Tunnel - Laser Shearography (LS)
Target of Investigation
Laser shearography reveals surface or subsurface discontinuities or anomalies, such as delamination, debonding, cracks, and voids.
Description
Laser shearography uses optical measurement for nondestructive testing and quality control applications. It is a noncontact method used to quickly detect defects.
Laser shearography is a full-field interferometry technique used to investigate a test object in a neutral and a loaded state. Out-of-plane deformations between the two states are identified by image processing; these deformations reveal surface or subsurface discontinuities or anomalies.(1)
Physical Principle
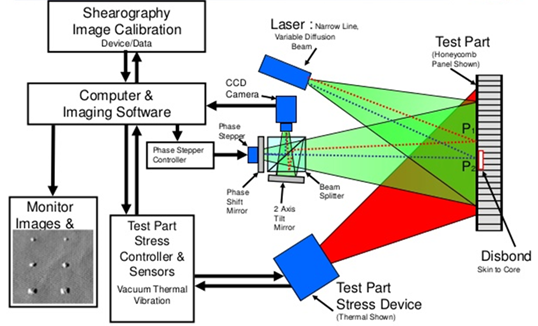
The physical principle of shearography is illustrated in figure 1. The test sample is illuminated using a laser and imaged on a charged coupled device (CCD) camera via a special optical shearing device. The shearing device coherently combines identical but laterally displaced images of the surface of the sample in the image plane. The resulting interferogram of the object wave is then recorded by a CCD camera.
 Source: NASA.P1 = A point on the object’s surface; P2 = Displaced position of point P1.
Local deformation can be induced by any combination of thermal, acoustical, or mechanical loading under static or dynamic situations. The loading situation results in a different interference fringe pattern that is directly related to the deformation state. Local surface deformations caused by defects inside the object can be found by comparing the interference fringes before and after loading. Only specimens with surface roughness of one wavelength of light or more produce accurate results.(5) Smooth surfaces will produce random interference and incorrect inspection results, which can usually be addressed by using talc or fine dust on the surface.
Data Acquisition
Users of laser shearography equipment should refer to the manufacturer’s manual. ASTM E2581-14, Standard Practice for Shearography of Polymer Matrix Composites and Sandwich Core Materials in Aerospace Applications, provides general information.(3) Raw data can be kept as a permanent record for future processing and evaluation. With some software, the data can be stored in JPEG, TIF, or other image formats.
Data Processing
Usually, the shearography system automatically processes data it collects to attain higher resolution, lower noise, and clearer presentation. Extra data processing can be performed with the software provided by manufacturers.
Data Interpretation
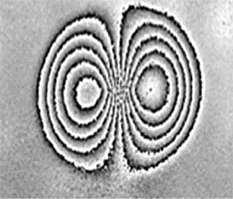
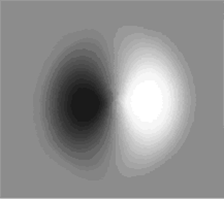
Flaw areas are indicated in phase maps; a butterfly fringe pattern shows the first derivative of the out-of-plane deformation (figure 2-A).(4) An unwrapped phase map is a plot of the test object’s surface-deformation derivative without fringes (figure 2-B).
 Reprinted, with permission from ASTM E2581 14, Standard Practice for Shearography of Polymer Matrix Composites and Sandwich Core Materials in Aerospace Applications, © 2014 ASTM International, 100 Barr Harbor Drive, West Conshohocken, PA 19428. A copy of the complete standard may be obtained from ASTM International, www.astm.org.A. Phase map with fringes.
 Reprinted, with permission from ASTM E2581 14, Standard Practice for Shearography of Polymer Matrix Composites and Sandwich Core Materials in Aerospace Applications, © 2014 ASTM International, 100 Barr Harbor Drive, West Conshohocken, PA 19428. A copy of the complete standard may be obtained from ASTM International, www.astm.org.B. Unwrapped phase map without fringes.
 Advantages
The laser shearography method has the following advantages:(1)
- High sensitivity. Can measure surface displacements in the submicrometer range.
- Full field coverage. Can measure, record, and interpret data over a large area at one instance.
- Noncontact. Does not require contact with the specimen, so it has potential as a high‑speed method.
- Real time. Displays near-real-time phase images with live and active results.
Limitations
The laser shearography method has the following limitations:
- Only applicable for specimens with surface roughness of one wavelength of light or more.(5)
- An experienced individual is needed to interpret the results of the shearography test.
- Adequate overhead lighting of the specimen is required to achieve best results.
- Thermal deformation of an object may be detected, and the effects of such deformation must be considered in data analysis.
References
- Dantec Dynamics. (2018). “Non-Destructive Testing (NDT) with Laser Shearography.” (website) Skovlunde, Denmark. Available online: https://www.dantecdynamics.com/shearography-non-destructive-testing, last accessed January 15, 2019.
- Nichols, C. (2013). Nondestructive testing at NASA WSTF, Presentation to the American Institute of Aeronautics and Astronautics, Albuquerque, NM. Available online: https://www.slideshare.net/CharlesNichols1/albuquerque-aia-ac, last accessed January 15, 2019.
- ASTM E2581-14. (2014). “Standard Practice for Shearography of Polymer Matrix Composites and Sandwich Core Materials in Aerospace Applications.” Book of Standards 03.04, ASTM International, West Conshohocken, PA.
- Yang, L.X. and Hung, Y.Y. (2004). Digital Shearography for Nondestructive Evaluation and Application in Automotive and Aerospace Industries, Proceedings of the 16th World Conference on Non-Destructive Testing, Montreal, Canada.
- Asheesh. “Limitations of Shearography Non-Destructive Testing of Composites.” (website) Bright Hub Engineering. Available online: http://www.brighthubengineering.com/
manufacturing-technology/118355-shearography-non-destructive-testing-ndt/, last accessed January 15, 2019.


